This tutorial was written by Digital Studio Student Assistant, Michael Zschokke. Learn more about Michael and our other student assistants here.
WordPress is an easy-to-use content management system. You can use it to write stories, upload pictures, monitor site traffic, and many other features. In this tutorial, I will walk you through the basic tools to create your first blog post.
Step 1: Create a new site.
After navigating to http://wordpress.com, click “Start with a blog.” Choose a name for your blog.

Click “Select” to create your site. WordPress will take you to your new blog!
Step 2: Customize your blog.
Use the sidebar to customize your blog. This menu allows you to change the title, color, background, fonts, and various other functions. For this tutorial, we will change the colors. Select “Colors & Background” on the sidebar.

I chose a pale tan for my background color, but there are several options available. You can also pick your own color, which is done by setting the red/blue/yellow balance and contrast.

Step 3: Create a post.
Click “start a new post.” Title your post, and type the content below. WordPress allows you to alter the font and format like any word processor.

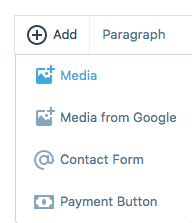
Clicking “Add” on the left side of the menu allows you to add a picture or video to the post.
Step 4: Finalize your post.
When you are ready to publish your post, select a category into which the post will be sorted. This allows visitors to easily browse your posts. I will place “George Washington” under the category of “Presidents.”

You should also select a “Featured Image” for your post. This will be image that is placed at the top of the post and shown when the post is shared via social media or email.

Step 5: Publish your post.
After you are satisfied with your post and its settings, click “Publish” in the top right corner the web page. Congratulations! You just created your first blog post!
You must be logged in to post a comment.