Tag Archives: blog

Digital Medieval Studies

How DH Has Helped Me Make Sense of My Field

Early in my graduate studies, when I took the Digital Humanities Colloquium at Boston College, the professor had us read a series of definitions of “the Digital Humanities” to introduce us to the scope of the work we might be doing. Many of these definitions rightly focused on interdisciplinarity, computational analysis, multimedia pedagogy and scholarship, and the need for an umbrella term to encourage institutional support and funding. One definition, however, continues to resonate with me as it is particularly germane to my own field of medieval studies: “[u]ltimately, what sets DH apart from many other humanities fields is its methodological commitment to building things as a way of knowing.” This emphasis on DH as primarily a methodology of building things clarifies what I can do with DH. When conceptualizing a new DH project, I begin by asking myself, “what am I hoping to build to help me know something new about this topic?”

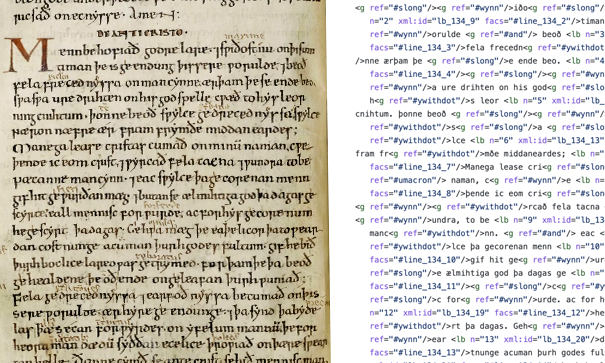
Often, the answer to that question has something to do with the materiality of the topic. As a translator in medieval studies, I have spent untold hours poring over manuscripts and textual editions, navigating the webs of cramped handwriting spilling across pages and the matrices of the apparatus criticus. Text encoding, the DH work I have done with such manuscripts, has given me a deeper insight into the physicality of the scribal tradition and allows me to represent the complexity of the folios. Because DH prioritizes the creation of new material, I get to know the material culture of my field more closely than I might have otherwise.

This digital methodology of “building” gives me a different way of knowing the content and the context of the material I study. Both formats, manuscript and XML file, have their affordances for marking intertextual material, line breaks, section headers, etc., and the painstaking encoding process creates an intimacy with the text which more traditional humanistic scholarship may not allow. In many ways, the detailed encoding (done in an XML file) feels like the practice of copying a manuscript, and the final result visually complements the original folio.

DH methodologies ask me to think about the medieval world in a new way, demanding that I consider how to transfer the technology of the manuscript into digital technology. As I build a digital manuscript of my own, I can almost see through the lens of the scribes themselves, how they constantly referred back to their source text to produce a faithful copy. Digital humanities offers a new entry point to the field and literally allows me to continue the tradition I study, and it doesn’t hurt that the end result is really cool, too!

Manuscript viewer built from the XML file above through Edition Visualization Technology v. 1.3. This work-in-progress provides multiple nodes of engagement with both the manuscript and the text itself.

Creating a Blog in WordPress

This tutorial was written by Digital Studio Student Assistant, Michael Zschokke. Learn more about Michael and our other student assistants here.

WordPress is an easy-to-use content management system. You can use it to write stories, upload pictures, monitor site traffic, and many other features. In this tutorial, I will walk you through the basic tools to create your first blog post.

Step 1: Create a new site.

After navigating to http://wordpress.com, click “Start with a blog.” Choose a name for your blog.

Click “Select” to create your site. WordPress will take you to your new blog!

Step 2: Customize your blog.

Use the sidebar to customize your blog. This menu allows you to change the title, color, background, fonts, and various other functions. For this tutorial, we will change the colors. Select “Colors & Background” on the sidebar.

I chose a pale tan for my background color, but there are several options available. You can also pick your own color, which is done by setting the red/blue/yellow balance and contrast.

Step 3: Create a post.

Click “start a new post.” Title your post, and type the content below. WordPress allows you to alter the font and format like any word processor.

Clicking “Add” on the left side of the menu allows you to add a picture or video to the post.


Step 4: Finalize your post.

When you are ready to publish your post, select a category into which the post will be sorted. This allows visitors to easily browse your posts. I will place “George Washington” under the category of “Presidents.”


You should also select a “Featured Image” for your post. This will be image that is placed at the top of the post and shown when the post is shared via social media or email.


Step 5: Publish your post.

After you are satisfied with your post and its settings, click “Publish” in the top right corner the web page. Congratulations! You just created your first blog post!